Sunday, 11 April 2010
iPad user experience
Finally I've got the iPad and now I am writing this article with my iPad. Whenever I was in the meeting or conference I wanted to have something easy to type and smaller than laptop in my hand but I could not find any useful devices so far. iPad is the device I was looking for and this is an amazing, beautiful and super fun device I ever had. .....except for virtual keyboard. Especially in horizontal mode, each key is rather bigger than my finger and also bigger than my hard apple keyboard. There are a little bit wider spaces between keys and thus it causes typing errors and the fill- in screen is rather small than in the viewer mode. I felt whenever I type in the input field or text area automatically target areas or input fields shrinks down a little bit and the virtual keyboard pops up in an enormous size. Who did design this virtual keyboard...????? This is pretty annoying situation: I lean on the couch, I want to write something but it is hard to read whenever I am typing and With both hands I am making key in errors with the huge virtual keyboard, and thus I ended up typing with two fingers. Oh, Please apple virtual keyboard designer, " consider my finger size in a horizontal modes!
Wednesday, 7 April 2010
iPhone Mobile Web icon
With Add to "Home Screen" feature by iPhone, any website can easily expand to Mobile web page by adding 57*57 image (png).
This is easy step.
1. Create your own icon (57*57 png format)
Create a 57x57 PNG.
Name it "apple-touch-icon.png"
How to create icon (glassy 57*57 png format)
http://developer.apple.com/safari/library/documentation/InternetWeb/Conceptual/iPhoneWebAppHIG/MetricsLayout/MetricsLayout.html#//apple_ref/doc/uid/TP40007900-CH6-SW31
2. locate this icon on Root on your website
Throw it in the root folder of your website. (Not the root of your server, the root of your web documents.)
3. Add link tag on your landing page
Here is the information
How to add icon on the website
http://developer.apple.com/safari/library/documentation/AppleApplications/Reference/SafariWebContent/ConfiguringWebApplications/ConfiguringWebApplications.html
add link tag
href="http://url/images/twitter_57.png" rel="apple-touch-icon"
4. Nothing to do - Safari works for you
t's basically just a 57x57 pixel PNG image with no special effects applied. The device itself will add rounded corners, a drop-shadow, and a glassy reflection
Tuesday, 6 April 2010
CruiseControl
Continuous Integration With Cruise Control
Outline
0. Overview
1. Subclipse For Eclipse
2. Auomated Builds
3. Auomated Testing
4. Auomated Deployment
0. Overview
Problem Statement
Developing, building, testing, and deploying software presents a set of challenges as changes to the software are introduced.
Different versions of files must be tracked and tagged so there can be a snapshot of the software at a particular time. Without a snapshot, there is no point by which to know what version of the software is released.
Broken builds wastes time and money. In a team environment, developers often work on the same source files simultaneously. And if a developer does not have the latest working set of files, his or her build may break. Secondly, a developer may forget check in his or her changes, breaking the build for everyone. If the second case happens in a multinational corporation, much more time is lost due to developers working at different hours.
When a build is successful, new changes introduced in the build may break its intended functionality. Regression tests can catch when new changes break the intended functionality.
The Solution
The solution is to have a tight and continuous integrated development, build, test, and deployment environment as the software code is updated; errors or failures at any step of the cycle should inform interested parties so the failure can be addressed immediately. By immediately fixing the failure, it does not hold up other team members from continuing their work. One particular proposal is to integrate SVN, Subclipse (SVN plugin for Eclipse), Ant build scripts, and Cruise Control into the development, build, test, and deployment processes.
SVN can be used to manage different versions of the software, from each file to the entire project. Projects can be tagged, branched, and later merged back into the main line. However, SVN is commandline based and is not user friendly since developers have to type SVN operations by hand. Using the Subclipse plugin for Eclipse, the developer can interact with the code under development and SVN from a GUI perspective.
As code is checked into SVN, Cruise Control can automate builds at certain time intervals using Ant build scripts. Email alerts will be sent out to interested parties with each successful or failed build so that problems in the build can be addressed immediately.
Automated testing can be done in two ways. First, Cruise Control can be setup to run JUnit tests associated with each Java class. Of course, JUnit test cases would have to be written. Secondly, scripts can be written to run regression tests, such as Selenium test suites, whenever a new application is deployed or at scheduled intervals.
Cruise Control can be extended to process automated deployment of successful builds. TBD.
1 Subclipse For Eclipse
1.1 Installation
After starting up Eclipse, install the Subclipse plugin by selecting the menu item Help-->Install New Software. Type in the url http://subclipse.tigris.org/update_1.6.x in the "Work With" textfield and follow the installation wizard.
1.2 SVN Operations
Before starting, we must create a new project checked out from SVN. Select File-->New-->SVN-->Checkout Projects From SVN.
Then create a new SVN repository to checkout from or select from an existing one.
Once the project is checked out in Eclipse, the developer can modify files and Commit them to SVN. Other common operations include updating to the latest revisions (HEAD), synchronizing with the repository, and working off of branches and tags.
To create a branch, select Team-->Branch/Tag and enter the url where the branch should be created.
To switch to a branch, select Team-->Switch To A Branch/Tag/Revision.
After work on the branch is done, merging the branch code back into the main line can be done by selecting Team-->Merge. From the Merge GUI, select "Reintegrate a branch".
2 Automated Builds
2.1 Ant build.xml File
The Ant build.xml file contains properties and tragets. Properties are key-value pairs. Targets are instructions on how to carry out tasks in the build process. Sometimes, targets have dependencies on other targets to be executed first. In the build.xml file below, the "main" target depends on other targets such as clean, copy, compile, war, and delete all of which are executed in the order listed.
This build.xml file will be used by Cruise Control to carry out the build.
2.2 Configuring Automated Builds in Cruise Control
To enable automated builds, modify Cruise Control's config.xml file by adding the particular SVN project parameters. There are many configuration parameters to set but there are a few noteworthy ones to highlight. First is the svnbootstrapper parameter which specifies to do an svn update on the project or file prior to each build attempt. The svn modificationset parameter instructs Cruise Control to check with svn to detect any modifications since the last build. If there are modifications, then the schedule parameter specifies how to do the build. In the example config.xml file below, ant is called on the build.xml file executing the main target. The artifactspublisher specifies the file created from the build. Who to email after each build attempt can be specified in the email parameter.
2.2Cruise Control UI
The Cruise Control UI is straighforward. From the Dashboard, a list of projects and the status of their last build is displayed. To view details builds for a particular project, click on that project. For a particular build, the user can view modifications of source files since the last build, the build log, test results, and any errors and warnings. To force a build, click on the cirucluar arrow.
Selenium
[Test] SIT with Selenium
Wednesday, March 31st, 2010
Automated SIT For DI
Outline
0. Overview
1. Configure SIT Web Application
2. Generating Test Scripts For Each FI
3. Running SIT
4. Detailed Installation Guide
0. Overview
SIT is automated with the SIT web application making calls to the Selenium IDE and Remote Control (RC) tools. Test scripts (suites) can be recorded with the Selenium IDE (a plugin to firefox) and executed with Selenium RC at the command line via Java. To perform full SIT, many test suites need to be executed and the results need to be displayed in an organized way. A user interface (web application) has been written to interface with the Selenium IDE and RC as well as the output results from Selenium. This document explains how to configure the SIT web application, configure SIT scripts for an FI (Financial Institution), run the scripts (through the web app), and how to view the results.
The user takes the following steps to automate SIT for FI’s.
Configure SIT Web User Interface
Generate Test Scripts For Each FI
Run SITon FIs
Top
1. Configure SIT Web Application
The SIT web application comes as a war file, sit.war. After grabbing the sit.war file from cruise control, place the sit.war file under Tomcat’s webapps directory. Click on the sit.war file link in cruise control to save it locally.
Another way to get the sit.war file is to build it by checking out the code from svn and run ant on build.xml against the main target.
Tomcat will explode the sit.war file in the directory structure below.
The SIT web application consists of jsp, java class, and image files. Deploy these files under tomcat’s webapps directory in a folder called “sit”:
WEB-INF directory containing compiled java class files
img directory containing images
batchfiles directory containing Windows batch files calling test scripts
testcases directory containing Selenium test scripts
testresults directory containing Selenium test results
tsgen directory containing scripts to automate creation of Selenium test cases
afidashboard.jsp UI to interact with each FI
selectTests.jsp selects which test to run for an FI
testit.jsp tests, displays results for each FI
build.xml ant build file to build sit.war
Install the following on the client machine:
Selenium IDE and RC
Firefox
ActivePerl for Windows
Tomcat for Windows
Top
2. Generating Test Scripts For Each FI
tsgen.pl and the properties file are part of the SIT web application that got exploded from the sit.war file. Open a command prompt and cd into the tsgen directtory. To generate test scripts for the SIT web application to execute, run the following command:
C:\apache-tomcat-6.0.20\webapps\sit\tsgen perl tsgen.pl properties\propertiesFile
The input to tsgen.pl is a properties file (sample properties files for usecu and vantage west) containing FI specific settings and input parameters to the generated test scripts. After creating a new properties file, please check the file into svn for the project DI_Autoscripts.
2.1 Properties
# template source directory and where to deploy testcases
templatedirtg directory where template test scripts reside
testcasedirtg directory where testcases should be deployed to under webapps directory
# backslashes are escaped (for compatibility with Perl)
# info for batch files
finametg fi name
ibsitetg url to ib site
mbsitetg mobile banking url
testresultsdirtg directory where test results should be deployed to
seleniumservertg file path to selenium-server.jar file
# batch files source and destination
templatebatchdirtg directory containing template batch files
destbatchdirtg directory where batch files should be deployed to
# Test script specific info
# premium bank or not
ispremiumtg true for premium, false for basic bank
## below substitutions in test scripts
### login info
timeoutsg number of milliseconds to wait for a web page to load before timing out
usernamesg username to log in as
passwordsg password for user
mfasuccesssg mfa answers (space separated between each answer)
finamesg finame
invalidUsernamesg value to input as invalid username
invalidUsernameSpecialsg invalid username with special characters
passwordSpecialsg invalid password with special characters
#contact us
phonenumbersg fi phone number
contactfinamesg fi full name
address1sg fi address 1
emailaddrsg fi email address
cityStateZipsg fi city, state, zipcode
# values “typed in” for tests 01-02-*
checkingsg regular expression matchng checking account name
savingssg regular expression matching savings account name
dateSpecialCharssg date with special characters
transactionStartDatesg start date for transaction search
transactionEndDatesg end date for transaction search
# test 01-02-03
transactionnamesg transaction name to look for
#test 01-03-02
loantransactionnamesg loan transaction name
loannamesg regular expression for loan name
#test-1-04-02 transfers, dates also used for payments
futuretransferdatesg future transfer date
futuretransferdatenodashsg future transfer date without the dashes
invalidamountsg invalid amoutn for transfer
pastdatesg past date for transfer
# making payments, 01-05-01
payeesg regular expression for payee name
weekenddatessg weekend date for payment
validpaymonthdatesg valid month and date
# pending payments, 01-05-02
paydatechangesg change payment date to this date
paydatechangemonthdatesg payment date text to look for (month and date)
# location search, test 01-06-02
citysearch2sg city name to search for
statesearch2sg state location belongs in
zipsearch2sg zip code of location
#rates, test 01-06-03
ratessg comma separated rates links
Names for checking, savings, loans, and loan transaction name can be expressed as a regular expresssion. In particular, the checking and savings name should be written in a way to match both the account and tranfers pages. A rule of thumb would be to ignore the numbers at end of the names. Then use the “*” characters to eat up the beginning and end parts of the name.
For example, on the transfers page, the checking account name is “71: PREMIUM CHECKING:7,000″. The same account is displayed in the accounts page as “PREMIUM CHECKING #71″. A regular expression to use for the checing account name can be “*CHECKING*”.
On the accounts page:
On the transfers page:
Top
3. Running SIT
3.1 Runing Selected SIT Testcases on Single FI
To run selected (and possibly the full) SIT test suite, access the SIT Dashboard page. For the local machine, go to http://localhost:8080/sit/afidashboard.jsp. The dashboard shows FI’s available for testing and status of the last run.
Mouseclick the selenium icon next to the FI’s name to go to the test selection screen for that FI.
Now select which test cases to run or to run the full test suite, toggle the checkall checkbox at the top. Press the “Run SIT” button to automate SIT on the selected test cases.
After the test run, the user will be taken to a page displaying the results of full SIT test. Each row in the table list the results of a set of testcases and corresponding result files. Click on a particular results file to view detailed results of that particular testcase.
Click on the Dashboard button to return to the dashboard.
Clicking on a particular test results file will take the user to detailed information about that particular testcase.
3.2 Full SIT on Selected FIs
To run SIT on selected FIs, the user can select the checkbox next to each FI or select all FIs to test by toggling the checkbox on the top. After selecting FIs to test, the user then clicks on the “Run SIT” button.
After running SIT on many FIs, the user will be taken back to the dashboard.
3.3 Viewing Test Results
To view test results for a particular FI, click on the file image in the same row as the FI’s name.
Top
4. Detailed Installation Guide
Friday, 2 April 2010
SVN
Subversion Client installation
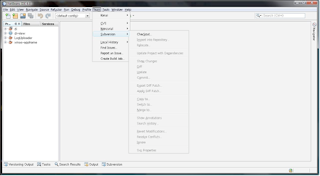
1. Team > Subversion > Checkout
2. On below screen, click the OK button.
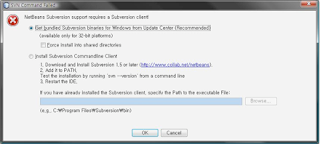
3. After checking license, click the OK button.
4. Click the Restart button to restart Netbeans.
Subversion connection
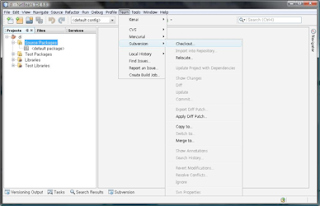
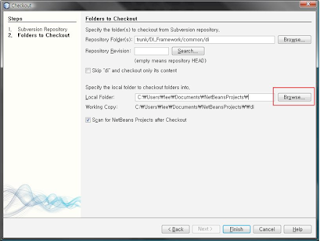
1. Select Team > Subversion > Checkout.
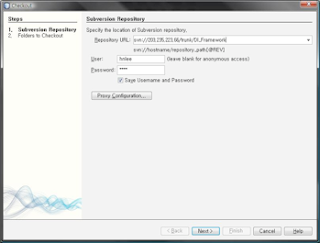
2. Repository URL : svn://203.235.223.66/trunk/DI_Framework/common/di
Type User and Password, and then click the Next button.
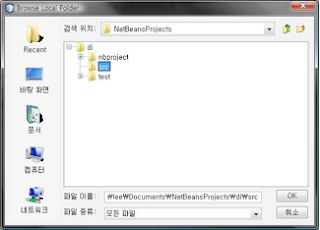
3. Select the Browse button on local Folder section.
4. Select di > src, and then click the OK button.
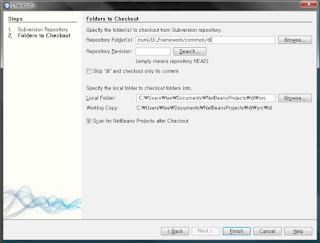
5. Click the Finish button.
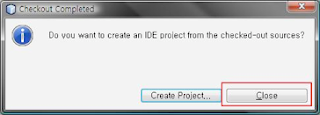
6. Click the close button.
1. Team > Subversion > Checkout

2. On below screen, click the OK button.

3. After checking license, click the OK button.
4. Click the Restart button to restart Netbeans.
Subversion connection
1. Select Team > Subversion > Checkout.

2. Repository URL : svn://203.235.223.66/trunk/DI_Framework/common/di
Type User and Password, and then click the Next button.

3. Select the Browse button on local Folder section.

4. Select di > src, and then click the OK button.

5. Click the Finish button.

6. Click the close button.

Net Beans Setup
1. On below installation screen, click the Customize button.
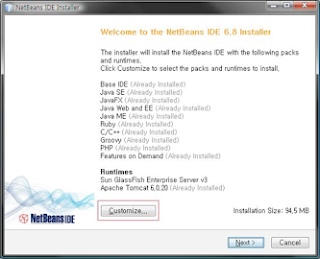
NetBeans installation
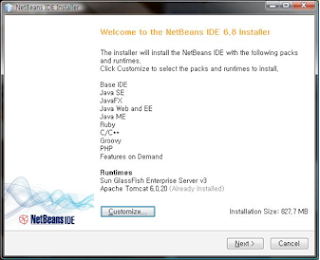
2. Click the apache tomcat check box, and then press the OK button.

3. After ensuring configuration, click the Next button.
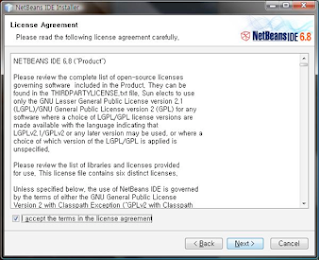
4. After checking License check box, click the Next button.
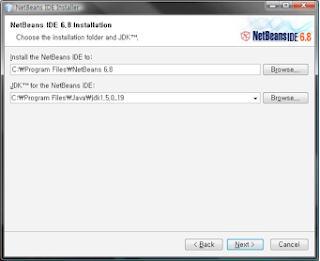
5. After checking the install and JDK location, click the Next button.
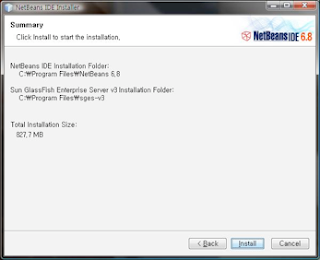
6. After checking the install location, click the Next button.

7. Click the Install button.
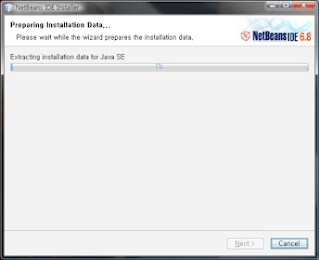
8. The installation is proceeding.
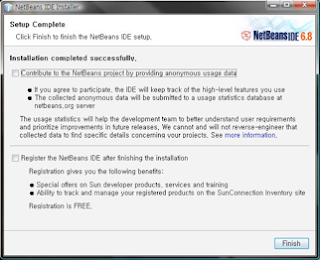
9. On below screen, click the Finish button.
NetBeans development
Project create
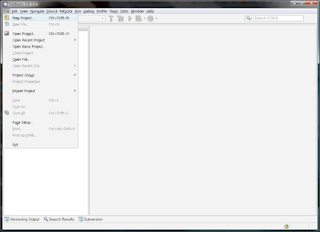
1. File > New Project
2. Select Java > Java Class Library, and then click the Next button.
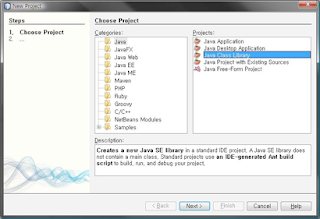
3. Input “di’ on Project Name field, and then click the Finish button.
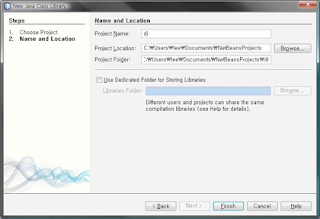
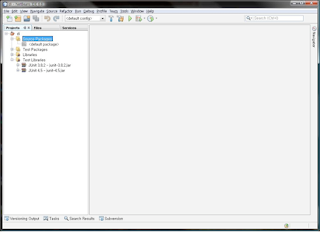
4. The creation of di project is completed.

NetBeans installation
2. Click the apache tomcat check box, and then press the OK button.

3. After ensuring configuration, click the Next button.

4. After checking License check box, click the Next button.

5. After checking the install and JDK location, click the Next button.

6. After checking the install location, click the Next button.

7. Click the Install button.

8. The installation is proceeding.

9. On below screen, click the Finish button.

NetBeans development
Project create
1. File > New Project

2. Select Java > Java Class Library, and then click the Next button.

3. Input “di’ on Project Name field, and then click the Finish button.

4. The creation of di project is completed.

Subscribe to:
Posts (Atom)